Hi everyone!
I recently started the journey to migrate everything off of UnraidOS onto a Virtual Machine running on UnraidOS to run all my containers. A home lab of my own of sorts!
With Docker running directly on UnraidOS it was easy to mount the correct directories to the containers, but when running through a Virtual Machine there were some extra steps required to get it working.
There are a lot of posts already on using 9p as the share mode, but many mention the read/write performance penalty when running on a Virtual Machine. I’ve seen a lot of posts about VirtioFS as being inherently faster but nothing showing how to get it set up on a Linux machine — only Windows. This guide fixes that.
I’m assuming you have already set up your Virtual Machine and have Linux running. Below are the steps to mount a path from your Unraid array into the virtual machine using VirtioFS.
Step 1: Configure shares in VM settings
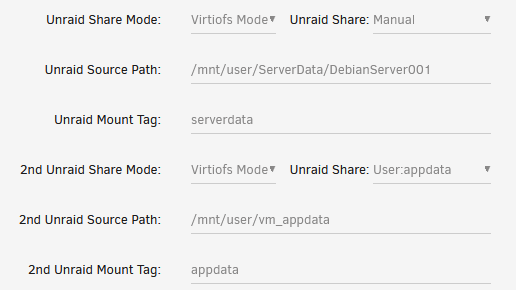
The first thing is to set up our shares in the Virtual Machine settings. I’ve set up 2 shares — one on my cache array as my fast /mnt/user/vm_appdata share and the other a general data storage at /mnt/user/DebianMachine001.
Step 2: Edit /etc/fstab
Once the shares are configured, start up (or restart) your virtual machine and open an SSH session. We are going to edit /etc/fstab to automatically mount our shares.
sudo nano /etc/fstabAdd the following lines at the end of the file, specifying the mount tag, target directory, driver, and options. Here I’m mounting two shares — serverdata and appdata:
serverdata /mnt/serverdata virtiofs rw,relatime 0 0
appdata    /mnt/appdata    virtiofs rw,relatime 0 0
Breaking down each part:
serverdata/appdata— the Unraid Mount Tag you specified in VM settings/mnt/serverdata//mnt/appdata— the target mount path on the virtual machinevirtiofs— the driver (use9pas the alternative, but VirtioFS is faster)rw— read and write (userofor read-only)relatime— a balanced option betweenatimeandnoatimefor r/w performance- Leave the dump/pass fields as
0
Step 3: Mount and verify
Save the file and exit. Run the following command to mount everything and check the output:
mount -av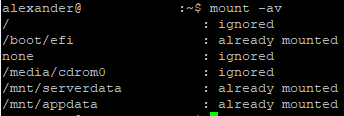
You’ll see a message stating the shares were “successfully mounted”. Verify with:
ls -l /mnt
Performance
I did some file transfers for both read and write to make sure speeds were good and averaged around 600 Mb/s for all transfers to my array. Use dd for benchmarking:
dd if=/path/to/source/file of=/path/to/destination/file bs=1M conv=fsync status=progressParameters:
if=— input file pathof=— output file pathbs=1M— block size of 1 megabyteconv=fsync— disables write caching by syncing data to disk after each write, giving accurate (not cached) speedsstatus=progress— displays progress and transfer rate
I hope this helped you get your share set up on your UnraidOS Virtual Machine!